Development Installation
These are development setup and standards that are adhered to by the core development team while developing Read the Docs and related services. If you are a contributor to Read the Docs, it might a be a good idea to follow these guidelines as well.
Note
We do not recommend to follow this guide to deploy an instance of Read the Docs for production usage. Take into account that this setup is only useful for developing purposes.
Set up your environment
install Docker following their installation guide.
clone the
readthedocs.orgrepository:git clone --recurse-submodules https://github.com/readthedocs/readthedocs.org/install the requirements from
commonsubmodule:pip install -r common/dockerfiles/requirements.txtbuild the Docker image for the servers:
Warning
This command could take a while to finish since it will download several Docker images.
inv docker.buildTip
If you pass
GITHUB_TOKENenvironment variable to this command, it will add support for readthedocs-ext.pull down Docker images for the builders:
inv docker.pull --only-lateststart all the containers:
inv docker.up --init # --init is only needed the first timeadd read permissions to the storage backend:
go to http://localhost:9000/ (MinIO S3 storage backend)
login as
admin/passwordclick “…” next to the
staticbucket name and then “Edit Policy”leave “prefix” empty and click “Add” to give “Read Only” access on the
staticbucketclick on the “+” icon on the bottom-right corner, then “Create bucket” with the name
media, hit Enter on the keyboard, and repeat the operation above to give “Read Only” access to it
go to http://community.dev.readthedocs.io to access your local instance of Read the Docs.
Check that everything works
go to http://community.dev.readthedocs.io and check that the appearance and style looks correct (otherwise the MinIO buckets might be misconfigured, see above)
login as
admin/adminand verify that the project list appearsgo to the “Read the Docs” project, click on the “Build version” button to build
latest, and wait until it finishesclick on the “View docs” button to browse the documentation, and verify that it works
Working with Docker Compose
We wrote a wrapper with invoke around docker-compose to have some shortcuts and
save some work while typing docker compose commands. This section explains these invoke commands:
inv docker.buildBuilds the generic Docker image used by our servers (web, celery, build and proxito).
inv docker.upStarts all the containers needed to run Read the Docs completely.
--no-searchcan be passed to disable search--initis used the first time this command is ran to run initial migrations, create an admin user, etc--no-reloadmakes all celery processes and django runserver to use no reload and do not watch for files changes
inv docker.shellOpens a shell in a container (web by default).
--no-runningspins up a new container and open a shell--containerspecifies in which container the shell is open
inv docker.manage {command}Executes a Django management command in a container.
Tip
Useful when modifying models to run
makemigrations.inv docker.downStops and removes all containers running.
--volumeswill remove the volumes as well (database data will be lost)
inv docker.restart {containers}Restarts the containers specified (automatically restarts NGINX when needed).
inv docker.attach {container}Grab STDIN/STDOUT control of a running container.
Tip
Useful to debug with
pdb. Once the program has stopped in your pdb line, you can runinv docker.attach weband jump into a pdb session (it also works with ipdb and pdb++)Tip
You can hit CTRL-p CTRL-p to detach it without stopping the running process.
inv docker.testRuns all the test suites inside the container.
--argumentswill pass arguments to Tox command (e.g.--arguments "-e py36 -- -k test_api")
inv docker.pullDownloads and tags all the Docker images required for builders.
--only-latestdoes not pullstableandtestingimages.
inv docker.buildassetsBuild all the assets and “deploy” them to the storage.
Adding a new Python dependency
The Docker image for the servers is built with the requirements defined in the current checked out branch.
In case you need to add a new Python dependency while developing,
you can use the common/dockerfiles/entrypoints/common.sh script as shortcut.
This script is run at startup on all the servers (web, celery, builder, proxito) which
allows you to test your dependency without re-building the whole image.
To do this, add the pip command required for your dependency in common.sh file:
# common.sh
pip install my-dependency==1.2.3
Once the PR that adds this dependency was merged, you can rebuild the image so the dependency is added to the Docker image itself and it’s not needed to be installed each time the container spins up.
Debugging Celery
In order to step into the worker process, you can’t use pdb or ipdb, but
you can use celery.contrib.rdb:
from celery.contrib import rdb; rdb.set_trace()
When the breakpoint is hit, the Celery worker will pause on the breakpoint and
will alert you on STDOUT of a port to connect to. You can open a shell into the container
with inv docker.shell celery (or build) and then use telnet or netcat
to connect to the debug process port:
nc 127.0.0.1 6900
The rdb debugger is similar to pdb, there is no ipdb for remote
debugging currently.
Configuring connected accounts
These are optional steps to setup the connected accounts (GitHub, GitLab, and BitBucket) in your development environment. This will allow you to login to your local development instance using your GitHub, Bitbucket, or GitLab credentials and this makes the process of importing repositories easier.
However, because these services will not be able to connect back to your local development instance, webhooks will not function correctly. For some services, the webhooks will fail to be added when the repository is imported. For others, the webhook will simply fail to connect when there are new commits to the repository.
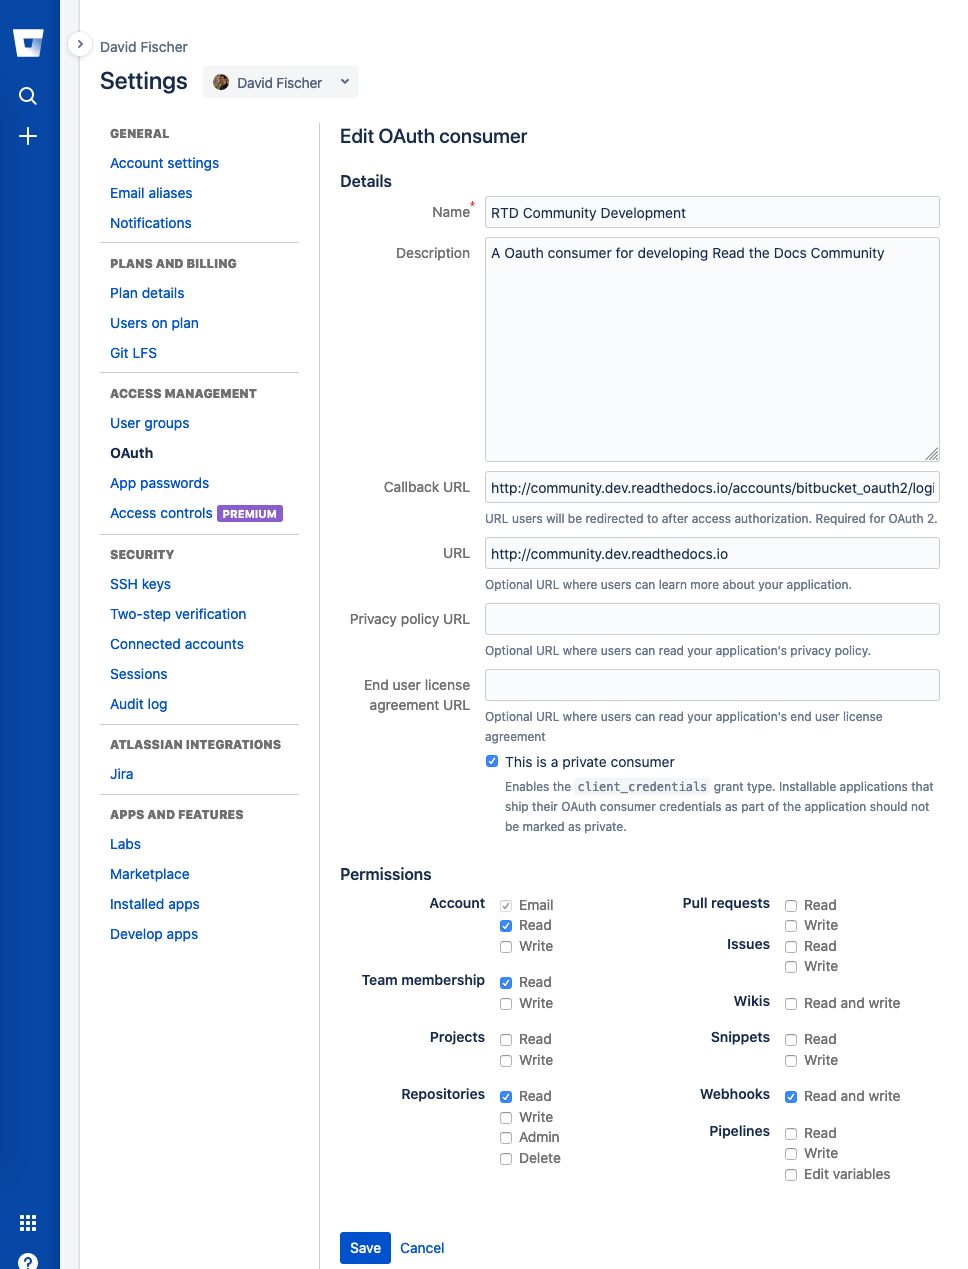
Fig. 11 Configuring an OAuth consumer for local development on Bitbucket
Configure the applications on GitHub, Bitbucket, and GitLab. For each of these, the callback URI is
http://community.dev.readthedocs.io/accounts/<provider>/login/callback/where<provider>is one ofgithub,gitlab, orbitbucket_oauth2. When setup, you will be given a “Client ID” (also called an “Application ID” or just “Key”) and a “Secret”.Take the “Client ID” and “Secret” for each service and enter it in your local Django admin at:
http://community.dev.readthedocs.io/admin/socialaccount/socialapp/. Make sure to apply it to the “Site”.
Core team standards
Core team members expect to have a development environment that closely approximates our production environment, in order to spot bugs and logical inconsistencies before they make their way to production.
This solution gives us many features that allows us to have an environment closer to production:
- Celery runs as a separate process
Avoids masking bugs that could be introduced by Celery tasks in a race conditions.
- Celery runs multiple processes
We run celery with multiple worker processes to discover race conditions between tasks.
- Docker for builds
Docker is used for a build backend instead of the local host build backend. There are a number of differences between the two execution methods in how processes are executed, what is installed, and what can potentially leak through and mask bugs – for example, local SSH agent allowing code check not normally possible.
- Serve documentation under a subdomain
There are a number of resolution bugs and cross-domain behavior that can only be caught by using
USE_SUBDOMAINsetting.- PostgreSQL as a database
It is recommended that Postgres be used as the default database whenever possible, as SQLite has issues with our Django version and we use Postgres in production. Differences between Postgres and SQLite should be masked for the most part however, as Django does abstract database procedures, and we don’t do any Postgres-specific operations yet.
- Celery is isolated from database
Celery workers on our build servers do not have database access and need to be written to use API access instead.
- Use NGINX as web server
All the site is served via NGINX with the ability to change some configuration locally.
- MinIO as Django storage backend
All static and media files are served using Minio –an emulator of S3, which is the one used in production.
- Serve documentation via El Proxito
Documentation is proxied by NGINX to El Proxito and proxied back to NGINX to be served finally. El Proxito is a small application put in front of the documentation to serve files from the Django Storage Backend.
- Search enabled by default
Elasticsearch is properly configured and enabled by default. All the documentation indexes are updated after a build is finished.